
If you notice damages on your tile roofing, it’ll be helpful to know how to repair a tile roof, especially if you plan to apply the fixes yourself. Tile roofs are a popular choice for homeowners in Denver, Colorado, thanks to their durability, visual appeal, and long lifespan. However, even the strongest roofs can encounter problems over time.
Cracks, missing tiles, hail marks, and broken corners are just a few damages on a tile roof that you may encounter. In this article, we will walk you through the basics of tile roof repair, common problems that can arise, and the general steps for fixing your tile roof.
Steps in How to Repair a Tile Roof
Before diving into how to repair a tile roof, we’ll begin with understanding the common causes of damage and the red flags that point to needing a tile roof repair.
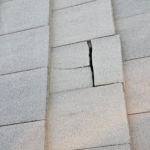
- Broken, Cracked, Missing Tiles: Tiles that are dislodged, cracked, chipped, or have visible damage allows water to penetrate the roof, which leads to leaks and further deterioration. Missing tiles are even more problematic, as the empty spaces expose your roof to water damage and compromise its structural integrity altogether.
- Leaks and water damage: Water stains on your ceiling, wet spots, or signs of water damage in your attic are all indications of roof leaks. These leaks can result from damaged or improperly sealed tiles and should be addressed immediately to prevent further problems.
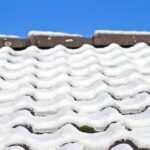
- Weather-related damage: Denver’s climate is known for its extreme weather conditions, including heavy snowfall, hailstorms, varying temperatures, and high winds. These weather events are one of the leading causes of damage to tile roofs.
- Damaged Flashing and Underlayment: Corroded or improperly sealed flashing and broken underlayment can cause water infiltration.
Additionally, everyday wear and tear, improper installation, and lack of maintenance can all contribute to the deterioration of your tile roof. Once you know what damage is on your roof, you can start preparing for repairs.
Step 1: Putting your Safety First
The basics of how to repair a tile roof start with prioritizing safety. Like with any roofing project, taking the necessary precautions can help prevent accidents and injuries. Add these items to your safety gear checklist when planning to DIY repair a tile roof:
- Personal protective equipment: Wear safety goggles, slip-resistant shoes, gloves, and appropriate clothing to protect yourself during the repair process. Additionally, consider using a safety harness if you’re working at heights.
- Ladder safety: Ensure your ladder is stable and secure before climbing. Use a ladder stabilizer or have someone hold the ladder for added stability. Follow proper ladder safety guidelines to minimize the risk of falls.
Additional Safety Tips:
- Double check that the base of your ladder is properly anchored before climbing up.
- Keep your hands free by using a tool belt to carry your tools. This way, you can easily steady yourself when climbing down the ladder.
- When placing your ladder, make sure that it is a safe distance from power lines and other hazards.
- Watch your step and avoid stepping on damaged tiles to avoid slipping and prevent worsening the damage on your roof.
Step 2: Preparing Tools and Materials
A successful roof repair requires essential tools and materials. However, different types of tile roof damage require different methods of repair, which means your needed tools and materials may vary depending on the repair type.
Additional materials (and skills!) are also needed for fixing bigger problems such as damaged underlayment and structural issues. Here’s a general list of repair materials needed to repair a tile roof:
- Replacement tiles: You’re going to need replacement tiles that match the style, color, and material of your existing tiles. It’s extremely important to get matching replacements to achieve that seamless blend and visually appealing result.
- Roofing cement: Roofing cement is needed for sealing small cracks and holes and attaching tiles. Choose a high-quality cement to ensure a solid and durable bond.
- Flat pry bar: This tool is used to when handling roofing tiles, such as when lifting or lowering faulty tiles.
- Roofing Nails and Hammer: Nails are used to secure the replacement tiles in place. Ensure that you have the appropriate nails for your specific tile roof. A hammer is necessary for driving the nails into the roof.
- Wire brush: Use the wire brush to clean the area around damaged tiles, such as removing dirt, debris, and loose material before applying roofing cement.
- Putty knife: A putty knife is useful for applying roofing cement to cracks and holes. Choose a putty knife with a flexible blade for easy application.
Some other tools that you may need in order to repair a roof tile are: crowbar, mortar, caulk gun, roofing felt, roof sealant, etc.
Step 3: Applying Repairs
Now that you have an understanding of the common causes of tile roof damage and the tools and materials needed for repair, let’s dive into the step-by-step process of how to repair a tile roof. Here’s a general rundown of what you need to do to repair a tile roof:
- Inspection and preparation: Begin by inspecting your roof for damaged or missing tiles. Take note of the extent of the damage and gather the necessary replacement tiles and tools. Ensure that you have a safe and stable workspace before starting the repair process.
- Removing damaged tiles: Carefully remove any damaged tiles using a putty knife or similar tool. Take caution not to further damage the surrounding tiles during this process.
- Cleaning the area: Use a wire brush to clean the area around the damaged tiles. Remove any dirt, debris, or loose material to create a clean surface for applying roofing cement.
- Applying roofing cement: Apply a generous amount of roofing cement to the cracked or damaged area using a putty knife. Ensure that the cement completely fills the cracks and provides a secure bond.
- Installing new tiles: Carefully place the replacement tiles onto the roofing cement, ensuring they fit snugly and align with the surrounding tiles. Press them firmly into place to create a strong bond.
- Securing tiles with nails: Secure the replacement tiles in place by driving nails through them and into the roof. Use the appropriate nails and hammer to ensure a secure attachment.
- Final inspections and touch-ups: Inspect the repaired area to ensure that the tiles are properly installed and secure. Make any necessary touch-ups or adjustments to achieve a seamless and professional finish.
Cost Estimation to Repair a Tile Roof
A do-it-yourself tile roof repair can be less expensive than hiring a professional, but you also have to take into consideration the costs of the tools and materials you’ll be needing to apply repairs. Factors that affect the cost of tile roof repairs are:
- extent of damage (how much material is needed to fix it)
- quality and brands of the materials
- buying tools needed for the repair that are unavailable at home
If you’re unsure about the repair estimate, you can take pictures and measurements of the damages as well as your roof and take it to your local Denver hardware or home improvement store and ask for help.
It’s important to take note that while DIY repairs can initially save you money, incorrect techniques and improper repairs can end up causing more damage and costing more money in the long run.
DIY Tile Roof Repair vs. Hiring a Denver Tile Roofing Professional
One or two cracked tiles can be an easy DIY fix, especially for homeowners that have the tools and prior experience. Do-it-yourself repairs work great for minor damages, but it’s important to recognize when a tile roof repair requires the attention of a professional.
Hiring a professional roofer to fix your roof ensures that all necessary repairs are done correctly. They have the tools, techniques, and specialized skills to properly handle your tile roof and apply the correct repairs. Getting the help of an expert gives homeowners the peace of mind that their roof is getting the care it needs.
If you are considering DIY repairs for your tile roof, take note that improper repairs can lead to further damage and may void warranties on your roofing materials.
Frequently Asked Questions
Here are some frequently asked questions about tile roof repair in Denver:
Q: How long does tile roof repair take?
A: The duration of tile roof repair depends on the extent of the damage and the size of the repair area. Minor repairs can typically be completed within a day, while more extensive repairs may take longer.
Q: Can I repair the roof myself?
A: While some minor repairs can be done by homeowners, it’s essential to have the necessary skills, experience, and safety precautions in place. For larger repairs or if you’re uncomfortable working at heights, it’s best to hire a professional roofing contractor.
Q: How much does tile roof repair cost?
A: The cost of tile roof repair varies depending on factors such as the extent of the damage, the type of tiles used, and the labor involved. It’s recommended to obtain quotes from multiple contractors to compare prices and services.
Bjorn’s Roofing: Best Tile Roof Repair Service Near You
With proper care and attention, your tile roof will continue to provide protection for many years to come. Bjorn’s Roofing provides professional tile roof repair services in Denver and nearby areas. Whether you have tile hail damage or broken tile roofing, we’re dedicated to providing expert roofing solutions for your tile roofing needs.
Contact us today for your FREE tile roof inspection!
Latest Posts
- Revealing the 3 Common Causes of Cracks on Tile Roofing for Parker, CO, Homeowners
 Seeing cracks on tile roofing can be alarming, but don’t panic just yet. It’s true that tile roofs are a popular choice among the various roofing options available for their durability, longevity, and aesthetic appeal. However, despite being one of the toughest roofing choices, they can still develop cracks and failures over time, which completely …
Revealing the 3 Common Causes of Cracks on Tile Roofing for Parker, CO, Homeowners Read More »
- 5 Significant Effects of Winter on Tile Roofs: Best Ways to Prepare Your Roof for Snow in Centennial, Colorado
 When the winter season arrives, homeowners need to be aware of how the harsh weather conditions can affect their tile roofs. Tile roofs are known for their durability and longevity, but they are not immune to the challenges brought on by winter weather. In this comprehensive guide, we will explore the various ways in which …
 - Dealing with Hail Damage on Tile Roofs: 5 Helpful Pro Tips for Aurora, Colorado, Homeowners
 Hail damage on tile roofs is something Aurora homeowners have to deal with from time to time, but especially so when the Colorado hail season begins. Throughout mid April to mid September, these hailstorms can be frequent and at times destructive. While tile roofing is one of the most durable types of roofing available, the …
 - 5 Steps in DIY Tile Roof Repair: Quick and Easy Fix for your Highlands Ranch Tile Roofing
 Learning how to do a simple DIY tile roof repair is a great skill for Highlands Ranch, Colorado, homeowners. Knowing how to deal with cracks and broken roof tiles definitely comes in handy, especially after severe weather like hail and strong winds, which are known to cause damages on tile roofs. Apart from being a …
Related: repair a tile roof, roof tile repair, tile roof repair costs, cost to repair a tile, cracked roof tile, repair tile roof, clay tile roofs, tile roof repair, tile roofing repair, diy tile roof repair, repairing tile roof, time to repair a tile roof, steps to repair a tile roof, tile roof repair materials