
A damaged roof can be a nightmare for homeowners. Not only do you have to deal with the process of filing a roof claim, but you also have to worry about fixing damages as soon as possible. From inspecting your roof to talking with adjusters, ensuring everything is in order can be a handful.
In this blog, I’ll go over what you need to know and what steps you can take when filing for a roof claim. Understanding how these claims work can help you navigate the process more smoothly and ensure a fair settlement.
What is a Roof Claim?
A roof claim refers to the process of seeking compensation or reimbursement from an insurance company for damages on your roof. They typically fall under the property damage section of your homeowner’s insurance policy.
This coverage is meant to protect you in the event of unexpected damage to your roof, such as from severe weather conditions or accidents.
What can cause Roof Damage?
Roof damage can occur for various reasons, with the most common causes including severe weather events like storms, hail, and heavy winds. These natural disasters can wreak havoc on your roof, causing shingles to become loose or damaged, leading to leaks and further structural issues.
Other common causes of roof damage include falling trees or branches, which can cause significant damage upon impact. Additionally, age and wear and tear can take a toll on your roof over time, leading to deterioration and the need for repairs or replacement.
A damaged roof can compromise your house’s structural integrity and lead to other costly issues if not addressed promptly. Reviewing your policy and understanding the specific coverage and exclusions for roof damage is essential.
What to do When Filing a Roof Claim
If your roof has been damaged, it’s essential to take immediate action to prevent further deterioration and ensure the smooth processing of your roof damage claim. Here are the steps to follow when filing a roof insurance claim after damage occurs:
Step 1: Assess the Damage
Before filing a roof claim, it’s vital to assess the extent of the damage. This step is crucial as it will determine whether your claim is valid and how much coverage you may be entitled to.
However, it’s important to note that roof inspection can be dangerous, so it’s best to leave it to the professionals. They have the expertise to identify both visible and hidden damages that may not be apparent to an untrained eye.
Step 2: Document the Damage
Documentation will be crucial when filing a roof claim, as it provides evidence of the extent of the damage. During the inspection, the professional roofer will take pictures of the damaged areas and provide a written explanation of the necessary repairs and estimated costs. Additionally, it’s advisable to take periodic photos of your roof, especially after maintenance or repairs.
Proper documentation is key to ensuring a fair settlement when filing a roof insurance claim. Here are some tips for documenting roof damage for your roof claim:
- Photographs and videos: Take clear and detailed pictures or videos of the damage. Capture different angles and close-ups to provide a comprehensive view.
- Date and time stamp: Make sure your photographs and videos are time-stamped to establish when the damage occurred.
- Written description: Provide a written description of the damage, including any visible signs of leaks, missing or damaged shingles, or structural issues.
- Expert opinion: Hire a professional roofing contractor to assess the damage and provide a written report. This report can serve as an expert opinion supporting your claim.
- Keep receipts and invoices: Keep copies of any receipts or invoices related to temporary repairs or expenses incurred as a result of the damage. These documents can help substantiate your claim.
Step 3: Apply Temporary Repairs
Even minor damages on your roof can quickly escalate into bigger problems when left unattended. When your roof has granule loss, broken shingles, hail damage, and the like, you may need to apply temporary repairs to prevent these from worsening.
Your roofing contractor should cover exposed areas with tarps or use temporary seals to prevent leaks. The costs of temporary repairs are usually included in your roof claim.
Step 4: Contact your Insurance Company
Contact your insurance company as soon as possible to report the damage and initiate the roof claim process. It’s important not to delay, especially after a severe weather event, as there may be a surge in claims.
Provide your insurer with all the necessary information, such as the date and time of the damage, along with the documentation you have gathered.
Step 5: Schedule an Adjuster Visit
After notifying your insurance company, they will typically send an insurance adjuster to assess the damage. Coordinate with your roofing contractor to ensure they are present during the adjuster’s visit. Their expertise can help point out specific areas of concern and ensure a thorough evaluation. Take notes during the visit, including the adjuster’s name, visit date, and claim number, for future reference.
After the adjuster’s inspection, your insurance company will determine the necessary repairs or roof replacement. Your roofing contractor will work closely with the insurance company to ensure that the scope of work aligns with the assessment. Clear communication between all parties involved is crucial to avoid any misunderstandings.
Navigating the Roof Claim Process
Filing an insurance claim for roof damage can be overwhelming, but understanding the steps involved can help you navigate it more effectively. Here’s a breakdown of the typical process:
- Initial claim submission: After notifying your insurance company, you will be required to submit a formal claim. This includes providing all the necessary documentation and information about the damage.
- Insurance company assessment: Once your claim is submitted, the insurance company will assign an adjuster to assess the damage. The adjuster will inspect your roof, review the documentation, and determine the value of the claim.
- Claim approval or denial: Based on the assessment, the insurance company will either approve or deny your roof claim. If approved, they will provide you with a settlement offer. If denied, they will provide a detailed explanation for the denial.
- Negotiation: If you are not satisfied with the initial settlement offer, you can enter into negotiations with your insurance company. Present any additional evidence or documentation that supports your claim and request a fair settlement.
- Settlement agreement: Once a settlement is reached, you will receive a settlement agreement outlining the terms and amount of the settlement. Review it carefully before accepting.
Claim Approval: Starting the Roofing Project
With the insurance repair estimate in hand, your roofing contractor will schedule the start of the project. They will order the necessary materials, which will arrive at your property before the work begins. The timeline for completion will be agreed upon by you, the contractor, and the insurance company.
How are the payments handled?
Payment for the roofing project is typically handled through the insurance company. If you have a mortgage on your property, the insurance settlement check will likely be made out to both you and your mortgage lender.
The lender will endorse the check and use the funds to ensure that the necessary repairs are completed. After the work is done, you may be responsible for any additional payments to the contractor, depending on the insurance coverage and the final cost of the project.
Choosing the Right Roofing Contractor for your Roof Claim
When it comes to repairing or replacing your damaged roof, choosing the right roofing contractor is crucial. Here are some factors to consider when selecting a contractor for your insurance claim:
- Insurance and licensing: Ensure that the roofing contractor is properly insured and licensed. This protects you from liability in case of any accidents or damage during the repair process.
- Written estimates: Obtain written estimates from multiple contractors. Compare the scope of work, materials, and costs to make an informed decision.
- Warranty: Inquire about the warranty offered by the contractor. A reliable contractor should provide a warranty for their work to ensure your peace of mind.
- Communication and responsiveness: Choose a contractor who communicates effectively and is responsive to your questions and concerns. Clear communication is essential throughout the claims process.
Bjorn’s Roofing: Trusted Morrison Roofer
Filing a roof insurance claim doesn’t have to be overwhelming, especially when you’re working with trusted and reliable roofers. Bjorn’s Roofing provides excellent roofing services, from roof inspections to repairs and replacements. Whether you’ve got storm or hail damage, we’ve got you covered. We’re dedicated to providing top-notch service that brings outstanding results. With Bjorn’s Roofing, your roof is in the best hands.
Remember that if you have recently experienced roof damage, don’t delay in initiating your insurance claim. It’s important to review your policy, gather evidence, and keep detailed records of all expenses. By following the steps outlined in this guide, you can navigate the process with confidence.
Latest Posts
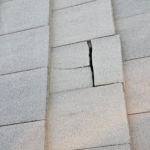
- Revealing the 3 Common Causes of Cracks on Tile Roofing for Parker, CO, Homeowners
 Seeing cracks on tile roofing can be alarming, but don’t panic just yet. It’s true that tile roofs are a popular choice among the various roofing options available for their durability, longevity, and aesthetic appeal. However, despite being one of the toughest roofing choices, they can still develop cracks and failures over time, which completely …
Revealing the 3 Common Causes of Cracks on Tile Roofing for Parker, CO, Homeowners Read More »
- 5 Significant Effects of Winter on Tile Roofs: Best Ways to Prepare Your Roof for Snow in Centennial, Colorado
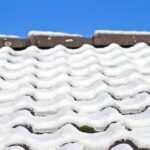 When the winter season arrives, homeowners need to be aware of how the harsh weather conditions can affect their tile roofs. Tile roofs are known for their durability and longevity, but they are not immune to the challenges brought on by winter weather. In this comprehensive guide, we will explore the various ways in which …
 - Dealing with Hail Damage on Tile Roofs: 5 Helpful Pro Tips for Aurora, Colorado, Homeowners
 Hail damage on tile roofs is something Aurora homeowners have to deal with from time to time, but especially so when the Colorado hail season begins. Throughout mid April to mid September, these hailstorms can be frequent and at times destructive. While tile roofing is one of the most durable types of roofing available, the …
 - 5 Steps in DIY Tile Roof Repair: Quick and Easy Fix for your Highlands Ranch Tile Roofing
 Learning how to do a simple DIY tile roof repair is a great skill for Highlands Ranch, Colorado, homeowners. Knowing how to deal with cracks and broken roof tiles definitely comes in handy, especially after severe weather like hail and strong winds, which are known to cause damages on tile roofs. Apart from being a …
Related: roof insurance claim, insurance claim for roof damage, roof damage insurance claim, repair roof replacement, roof repair replacement, kinds of roof damage, roof repair morrison, roof claim insurance, roof damage repair